A refrigerator works around the clock, 365 days a year. That’s roughly 8,760 hours of continuous operation, making it one of the hardest-working appliances in any home. Whirlpool refrigerators are built to handle that load, but only if they’re properly maintained. Neglect basic upkeep, and even a quality fridge will start showing signs of wear: uneven cooling, strange noises, ice buildup, or skyrocketing energy bills. The good news? Most maintenance tasks take less than 20 minutes and require nothing more than a vacuum, a screwdriver, and a bit of attention. This guide walks through the specific steps homeowners need to keep their Whirlpool refrigerator running efficiently for a decade or longer.
Table of Contents
ToggleKey Takeaways
- Regular Whirlpool refrigerator maintenance prevents energy consumption from increasing by 25% or more and can extend the appliance’s lifespan by five years or longer.
- Monthly cleaning of condenser coils and water filter replacement are the two most critical maintenance tasks to prevent performance decline and ensure food safety.
- Quarterly inspections of door gaskets, defrost drains, and the drain pan catch small issues early, helping you avoid costly repairs or premature replacement.
- Proper leveling (tilting slightly backward), temperature verification, and door seal checks are essential annual tasks that prevent frost buildup, water pooling, and self-closing door failure.
- Most Whirlpool refrigerator maintenance tasks require less than 20 minutes per month and only basic tools like a vacuum, coil brush, and screwdriver.
Why Regular Maintenance Matters for Your Whirlpool Refrigerator
Refrigerator maintenance isn’t optional, it directly affects performance, longevity, and operating costs. The compressor, condenser coils, and evaporator fan work together to remove heat from the interior cabinet. When dust and debris accumulate on the coils, the compressor has to work harder and run longer to maintain temperature, which increases electricity consumption by 25% or more.
A poorly maintained refrigerator also struggles with temperature consistency. Food in the back may freeze while items near the door stay too warm, creating both waste and food safety concerns. Buildup of ice in the freezer or water pooling beneath crisper drawers often signals a clogged defrost drain or a failing door seal, both preventable with routine checks.
Beyond performance, appliance maintenance routines can add years to a refrigerator’s lifespan. The average fridge replacement costs between $1,000 and $2,500, depending on size and features. Spending an hour every few months on preventive care can delay that expense by five years or more.
Finally, manufacturers’ warranties typically require evidence of proper maintenance to honor certain claims. Whirlpool’s warranty may not cover compressor failure if neglect contributed to the breakdown, another reason to keep a simple log of cleaning dates and filter changes.
Essential Monthly Maintenance Tasks
Two tasks deserve monthly attention: cleaning the condenser coils and replacing or checking the water filter. These are the most common culprits behind declining refrigerator performance.
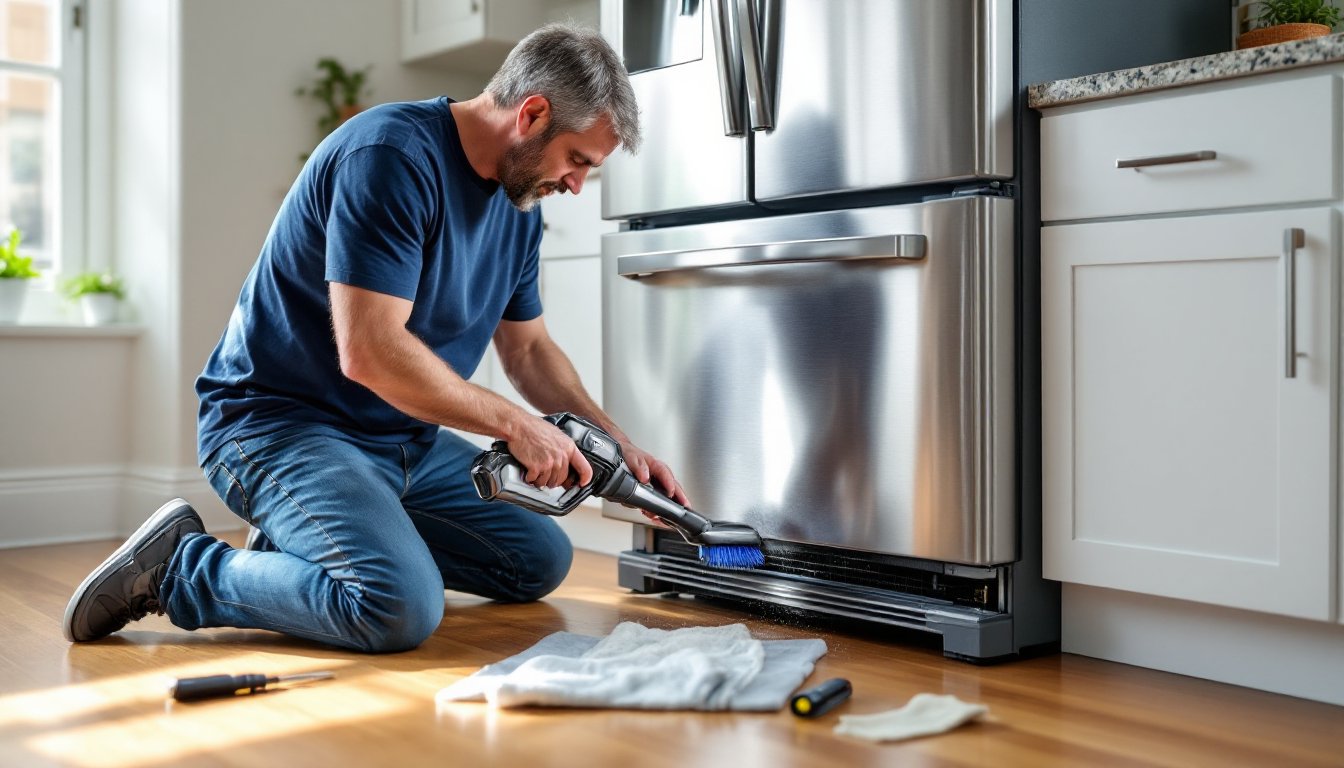
Clean the Condenser Coils
The condenser coils release heat absorbed from the refrigerator’s interior. On most Whirlpool models, they’re located either behind a lower front grille or across the back panel. Dust, pet hair, and kitchen grease coat these coils over time, acting as insulation that traps heat and forces the compressor to cycle more frequently.
Tools needed:
- Coil brush or crevice vacuum attachment
- Screwdriver (if access panel is secured)
- Flashlight
Steps:
- Unplug the refrigerator. Safety first, never work on a live appliance.
- Locate the coils. Check the owner’s manual if unsure. Front-access coils sit behind the toe kick grille: rear-access coils are visible once the fridge is pulled away from the wall.
- Remove the access panel using a screwdriver if necessary.
- Vacuum or brush the coils gently, working from top to bottom. A coil brush (available at most hardware stores for under $10) reaches between tight fins better than a standard vacuum.
- Clear the floor area beneath the fridge while it’s pulled out. Crumbs and debris can obstruct airflow.
- Replace the panel, plug in, and push the unit back, leaving at least 1 inch of clearance from the wall for airflow.
Frequency increases in homes with shedding pets or high kitchen traffic. In those cases, check coils every three to four weeks.
Check and Replace Water Filters
Whirlpool refrigerators with ice makers or water dispensers use inline water filters to remove sediment, chlorine, and contaminants. These filters have a finite capacity, typically 200 to 300 gallons or six months, whichever comes first. A clogged filter reduces water flow, causes the ice maker to produce smaller or misshapen cubes, and may allow impurities into drinking water.
Tools needed:
- Replacement filter (Whirlpool models usually require specific part numbers: check the manual or existing filter)
- Towel (to catch drips)
Steps:
- Locate the filter housing. Common locations include the upper-right interior corner, the base grille, or inside the refrigerator compartment near the top.
- Turn off the water supply if accessible (not always necessary, but reduces spills).
- Twist or press the release button to remove the old filter. Some models use a quarter-turn bayonet mount: others have a push-button eject.
- Discard the old filter (do not attempt to clean and reuse, it’s a consumable part).
- Install the new filter by aligning it with the housing and twisting or pushing until it clicks into place.
- Run 2 to 3 gallons of water through the dispenser to flush carbon fines from the new filter. Discard this water.
Set a phone reminder for six months out, or note the replacement date on a piece of masking tape stuck to the filter housing. Some Whirlpool models have a filter status light that changes from green to yellow to red as capacity is used.
Quarterly and Annual Maintenance Checklist
Beyond monthly tasks, a few seasonal checks keep the refrigerator in top shape and catch small issues before they escalate.
Every three months:
- Inspect door gaskets. The rubber or vinyl door seals should be pliable, not cracked or torn. Close the door on a dollar bill, if it pulls out easily, the gasket isn’t sealing properly and should be replaced. Clean gaskets with warm water and mild dish soap: grease buildup makes them stick poorly.
- Clean the interior. Remove all shelves and bins. Wash with a solution of 1 tablespoon baking soda per quart of warm water. Avoid harsh cleaners, they can leave chemical odors. Wipe down walls, paying attention to crevices where spills collect.
- Check the defrost drain. Located at the back of the refrigerator or inside the freezer, the defrost drain channels melt water to the drain pan. If clogged, water pools in the bottom of the fridge or freezer. Flush the drain with warm water using a turkey baster or small funnel. A pipe cleaner can dislodge stubborn blockages.
- Empty and clean the drain pan. This shallow tray sits beneath the refrigerator, often accessible from the front or rear. It collects defrost water, which evaporates over time. Mold and odors develop if it’s neglected. Slide it out, wash with soapy water, dry completely, and return.
Once per year:
- Test the ice maker. Run a cycle and inspect cube size and clarity. Cloudy or hollow cubes indicate water flow issues, check the inlet valve and filter.
- Vacuum the evaporator fan area. Some Whirlpool models allow homeowners to access the evaporator fan (behind a panel in the freezer). If comfortable doing so, vacuum any dust from the fan blades and surrounding area. Wear gloves and safety glasses, the area may have sharp edges. If unsure, hiring a professional through Angi or similar services ensures the job is done safely.
- Level the refrigerator. Use a bubble level on the top front edge. The unit should tilt slightly backward (about 1/4 inch from front to back) to allow doors to self-close and condensation to drain properly. Adjust the front leveling legs by turning them clockwise to raise or counterclockwise to lower.
- Verify the temperature settings. The refrigerator compartment should hold 37°F, and the freezer should be at 0°F. Use an appliance thermometer (not the built-in display, which can drift over time) to confirm. Adjust the thermostat dial if needed and recheck after 24 hours.
Troubleshooting Common Whirlpool Refrigerator Issues
Even well-maintained refrigerators run into occasional problems. Here’s how to diagnose and address the most frequent complaints.
Refrigerator not cooling:
- Check that the unit is plugged in and the outlet is live (test with another appliance).
- Confirm the temperature dial wasn’t accidentally turned down.
- Inspect condenser coils, if heavily clogged, cooling efficiency drops.
- Listen for the compressor. It should hum or vibrate slightly. Silence may indicate a compressor or start relay failure: this requires professional repair.
Frost buildup in the freezer:
- Frost along the back wall is often a sign of a defrost system malfunction. The defrost heater, defrost thermostat, or defrost timer may have failed. This is a repair job best left to a technician unless the homeowner is comfortable with electrical diagnostics.
- Check door seals. Warm air infiltration causes excessive frost.
Water pooling inside the fridge:
- Clear the defrost drain (as described in the quarterly checklist).
- Inspect the water line connections if the fridge has an ice maker or dispenser. A loose fitting can drip.
Noisy operation:
- A rattling sound usually means the fridge isn’t level or is vibrating against the wall.
- A clicking sound that repeats every few minutes may be the start relay or compressor struggling to start, this often precedes failure.
- A high-pitched squeal can come from the evaporator or condenser fan. Turn off the unit, locate the fan, and check for obstructions or worn bearings.
Ice maker not producing ice:
- Confirm the water supply valve (usually behind the fridge or under the sink) is fully open.
- Replace the water filter if it’s been longer than six months.
- Check the ice maker’s arm or sensor, if it’s stuck in the “off” position, the unit won’t cycle.
For repairs beyond routine maintenance, compressor replacement, refrigerant leaks, or electronic control board issues, consult a qualified appliance technician. Many homeowners find vetted professionals through HomeAdvisor, which also provides cost estimates based on local market rates.
Conclusion
A Whirlpool refrigerator that receives consistent, straightforward maintenance will outlast one that’s ignored by years, often a full decade or more. The tasks outlined here don’t require specialized skills or expensive tools, just a commitment to spending 20 minutes a month and an hour or two each season. Mark a calendar, set phone reminders, or tape a checklist to the side of the fridge. Small efforts add up to major savings in energy costs, repair bills, and appliance replacement.